ShopDreamUp AI ArtDreamUp
Deviation Actions


Suggested Deviants


Suggested Collections
![[New character] Iowyn](https://images-wixmp-ed30a86b8c4ca887773594c2.wixmp.com/f/d46cfbc9-24c1-4a09-829b-e2c438f6079f/d76g98u-6c9ac91f-f05c-40e4-a09e-a08a8a6771b9.png/v1/crop/w_184,h_184,x_27,y_0,scl_0.18145956607495,q_70,strp/_new_character__iowyn_by_twistyh_stock_d76g98u-92s-2x.jpg?token=eyJ0eXAiOiJKV1QiLCJhbGciOiJIUzI1NiJ9.eyJzdWIiOiJ1cm46YXBwOjdlMGQxODg5ODIyNjQzNzNhNWYwZDQxNWVhMGQyNmUwIiwiaXNzIjoidXJuOmFwcDo3ZTBkMTg4OTgyMjY0MzczYTVmMGQ0MTVlYTBkMjZlMCIsIm9iaiI6W1t7ImhlaWdodCI6Ijw9MTAxNCIsInBhdGgiOiJcL2ZcL2Q0NmNmYmM5LTI0YzEtNGEwOS04MjliLWUyYzQzOGY2MDc5ZlwvZDc2Zzk4dS02YzlhYzkxZi1mMDVjLTQwZTQtYTA5ZS1hMDhhOGE2NzcxYjkucG5nIiwid2lkdGgiOiI8PTE2MDAifV1dLCJhdWQiOlsidXJuOnNlcnZpY2U6aW1hZ2Uub3BlcmF0aW9ucyJdfQ.H4pHppvNbqefJhpZ1UzchlA8mO0E7xbE0RXReZTho7o)
![[New character] Iowyn](https://images-wixmp-ed30a86b8c4ca887773594c2.wixmp.com/f/d46cfbc9-24c1-4a09-829b-e2c438f6079f/d76g98u-6c9ac91f-f05c-40e4-a09e-a08a8a6771b9.png/v1/crop/w_92,h_92,x_13,y_0,scl_0.090729783037475,q_70,strp/_new_character__iowyn_by_twistyh_stock_d76g98u-92s.jpg?token=eyJ0eXAiOiJKV1QiLCJhbGciOiJIUzI1NiJ9.eyJzdWIiOiJ1cm46YXBwOjdlMGQxODg5ODIyNjQzNzNhNWYwZDQxNWVhMGQyNmUwIiwiaXNzIjoidXJuOmFwcDo3ZTBkMTg4OTgyMjY0MzczYTVmMGQ0MTVlYTBkMjZlMCIsIm9iaiI6W1t7ImhlaWdodCI6Ijw9MTAxNCIsInBhdGgiOiJcL2ZcL2Q0NmNmYmM5LTI0YzEtNGEwOS04MjliLWUyYzQzOGY2MDc5ZlwvZDc2Zzk4dS02YzlhYzkxZi1mMDVjLTQwZTQtYTA5ZS1hMDhhOGE2NzcxYjkucG5nIiwid2lkdGgiOiI8PTE2MDAifV1dLCJhdWQiOlsidXJuOnNlcnZpY2U6aW1hZ2Uub3BlcmF0aW9ucyJdfQ.H4pHppvNbqefJhpZ1UzchlA8mO0E7xbE0RXReZTho7o)


You Might Like…


Featured in Groups


Description
Photoshop Models and Objects Retrieval Tutorial
If you are unsure of some of the tools of processes I am talking about please checkout my other tutorials. If you still are confused please let me know.
 This tutorial was made in Photoshop Elements and as such the tools might be varied but this particular process can be done in all PS formats.
 ~ Before you start ~
Right first off there really is no right or wrong way to retrieve a model from it’s background. Many people will give you different advise to do it, but what it comes down to is what is easier for you.
Second
I have said before in my other photo-manipulation tutorials that you MUST cite ALL of your stocks used no matter how small. If not it’s considered art thieving.
With that part said…
~ Your PS Tools You Will Be Using ~
 Now assuming that you know some of the basics of your PS program and that you know what certain tools are your first step will be to
take a look at
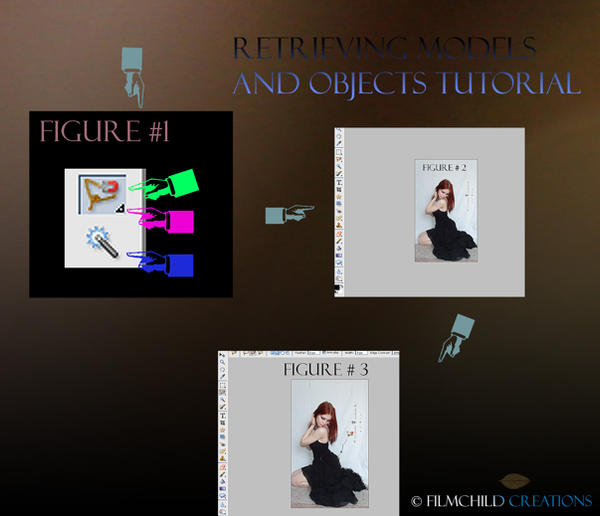
~ FIGURE 1~
These are the tools you will be using to retrieve your model.
 Your first had as you know is your lasso tool which as I explained in my previous tutorial helps to grab on to the outlines of objects.
Your second hand is the tool’s other options. You hold your mouse button down on the tool button to bring these up.
The lasso tool can either be used in:
* A magnetic way which means that it will try to grab on to the edges of something as you guide you mouse around it.
* A polygonal way which means that the lasso will only select in straight lines and not in natural curves,
* A manual lasso way which is simply drawing the selection lines yourself by hand.
Your third hand is your magic wand. This tools tries to select anything that it feels is important in the image. However this tool can be touchy and is better used for objects and models used with a blank background and not with a busy background as there is too much pixels for it to pick up.
Now that you know what your selection tools are now we’re going to use them.
~~~ ~~~ ~~~ ~~~ ~~~ ~~~ ~~~ ~~~ ~~~ ~~~ ~~~
~ You’ve Found Your Model, Now What? ~
Now lets say you have found your model but your model is not in what we call a “ zip file” ( meaning that the model has been removed from it’s background and is ready to just place in your manipulation)

The question you want to ask yourself is what kind of model do you want? When you find your model there is the chance that you will find one with a busy background.


But never fear sometimes this can be difficult when trying to “cutout” your model as your lasso tool will try to pick up everything else, but this comes with the territory. We do it all the time.
~~~ ~~~ ~~~ ~~~ ~~~ ~~~ ~~~ ~~~ ~~~ ~~~ ~~~
Take a look at ~FIGURE 2 ~
Let’s say you have chosen this model from this stock artist.
She’s pretty isn’t she?
I choose this particular model as the background is not entirely blank. So you’ll have a tad crash course in learning busy backgrounds.
NOTE - Do you notice the credit bar on the side of the image? It’s no big deal. Normally the lasso tool will try to stick to the edges of the model but if the credit bar gets in the way simply crop it out.
- The first thing you will want to do is go to your lasso tool. Click on it and select the magnetic option.
But your like why this option?
Because I said so!
No, really personally I have found that the magnetic tool is easier to use it this case.
~~~ ~~~ ~~~ ~~~ ~~~ ~~~ ~~~ ~~~ ~~~ ~~~ ~~~
Now take a look at ~FIGURE 3 ~
Now the retrieving begins. When you are doing this you image should look something like figure 3.
Simply click on a point of the edge of the model or object you are trying to retrieve.
Great.
A little square will appear to mark where you have started. All you have to do now is guide your mouse over the outline in the path that you want your section lines to follow.
Now when you reach around full circle around what you are trying to retrieve the lines and you connect your lines to your starting point square the lines will either complete themselves or when you want to stop simply press enter and the lines will start to glow.
NOTE - If you press enter too soon the lines will complete themselves in an odd way possibly cutting of some of your image. It’s best to complete the lines by ending them at your starting point.
~ Common Problems and Questions ~
Question - What the heck are those little squares am I doing something wrong?
~ Answer~ No your not. All those little squares are, are something like
selection line checkpoints. They help you see where the lines are going and where they shouldn’t so you can change them.
Problem- I guide my mouse over the outline but the selection lines keep cutting things off!
~ Answer~ Remember that you are working with a mouse, and that you can click your mouse button. When you guide you lines around your image click on the certain hard to follow edge or curve and small square will appear there selecting that annoying cut off point.
~ Problem~ Ok this is really stupid when I accidentally click or when I make a mistake I can’t go back! This is ridiculous!
~ Answer~ Ok calm down. Really it’s pretty common messing up when you work with your lasso tool. All you have to do when you move your mouse over something and the line goes awry simply press DELETE on you keyboard.
Well look at that it deleted the last indication square one move back! How nifty.
Problem - Now that I have the model selected NOW what do I do?
~ Answer~ Ok now you need to place your newly selected model in her own work space. All you have to do is this ~> Press CTRL C ~> CTRL N ~> CTRL V
WHAT THE HECK DOES THAT MEAN?? - Please see my shortcuts below.
After this is done you will see your model copy in the your picture in on the side. Toss out the white background so that you only have the model in the checkered background so that the model can be placed without a background into your work.
Don’t like what you have done? Start over again. A helpful hint is to ALWAYS save your model so if for any reason you can go back into your files and get it out again.
On a parting note, the real thing to do here is jus play around. It will click once you get it and then it will be easy.
Good luck!
~~~ ~~~ ~~~ ~~~ ~~~ ~~~ ~~~ ~~~ ~~~ ~~~ ~~~
~ PS shortcuts~
CTRL C - Copy
CTRL V - Paste
CTRL N - New layer or document
CTRL Z - Undo
CTRL Y- Redo
CTRL W - Close document
CTRL X - Cut from document
CTRL D - Deselect
Still confused? Or you want to learn something else? Let me know and I will try my best to help.
Special thanks to the stock artist used in this tutorial
© Filmchild Creations
If you are unsure of some of the tools of processes I am talking about please checkout my other tutorials. If you still are confused please let me know.
Right first off there really is no right or wrong way to retrieve a model from it’s background. Many people will give you different advise to do it, but what it comes down to is what is easier for you.
Second
With that part said…
~ Your PS Tools You Will Be Using ~
take a look at
~ FIGURE 1~
These are the tools you will be using to retrieve your model.
The lasso tool can either be used in:
* A magnetic way which means that it will try to grab on to the edges of something as you guide you mouse around it.
* A polygonal way which means that the lasso will only select in straight lines and not in natural curves,
* A manual lasso way which is simply drawing the selection lines yourself by hand.
Now that you know what your selection tools are now we’re going to use them.
~~~ ~~~ ~~~ ~~~ ~~~ ~~~ ~~~ ~~~ ~~~ ~~~ ~~~
~ You’ve Found Your Model, Now What? ~
Now lets say you have found your model but your model is not in what we call a “ zip file” ( meaning that the model has been removed from it’s background and is ready to just place in your manipulation)
The question you want to ask yourself is what kind of model do you want? When you find your model there is the chance that you will find one with a busy background.
But never fear sometimes this can be difficult when trying to “cutout” your model as your lasso tool will try to pick up everything else, but this comes with the territory. We do it all the time.
~~~ ~~~ ~~~ ~~~ ~~~ ~~~ ~~~ ~~~ ~~~ ~~~ ~~~
Take a look at ~FIGURE 2 ~
Let’s say you have chosen this model from this stock artist.
She’s pretty isn’t she?
I choose this particular model as the background is not entirely blank. So you’ll have a tad crash course in learning busy backgrounds.
NOTE - Do you notice the credit bar on the side of the image? It’s no big deal. Normally the lasso tool will try to stick to the edges of the model but if the credit bar gets in the way simply crop it out.
But your like why this option?
Because I said so!
No, really personally I have found that the magnetic tool is easier to use it this case.
~~~ ~~~ ~~~ ~~~ ~~~ ~~~ ~~~ ~~~ ~~~ ~~~ ~~~
Now take a look at ~FIGURE 3 ~
Now the retrieving begins. When you are doing this you image should look something like figure 3.
Simply click on a point of the edge of the model or object you are trying to retrieve.
Great.
A little square will appear to mark where you have started. All you have to do now is guide your mouse over the outline in the path that you want your section lines to follow.
Now when you reach around full circle around what you are trying to retrieve the lines and you connect your lines to your starting point square the lines will either complete themselves or when you want to stop simply press enter and the lines will start to glow.
NOTE - If you press enter too soon the lines will complete themselves in an odd way possibly cutting of some of your image. It’s best to complete the lines by ending them at your starting point.
~ Common Problems and Questions ~
Question - What the heck are those little squares am I doing something wrong?
~ Answer~ No your not. All those little squares are, are something like
selection line checkpoints. They help you see where the lines are going and where they shouldn’t so you can change them.
Problem- I guide my mouse over the outline but the selection lines keep cutting things off!
~ Answer~ Remember that you are working with a mouse, and that you can click your mouse button. When you guide you lines around your image click on the certain hard to follow edge or curve and small square will appear there selecting that annoying cut off point.
~ Problem~ Ok this is really stupid when I accidentally click or when I make a mistake I can’t go back! This is ridiculous!
~ Answer~ Ok calm down. Really it’s pretty common messing up when you work with your lasso tool. All you have to do when you move your mouse over something and the line goes awry simply press DELETE on you keyboard.
Well look at that it deleted the last indication square one move back! How nifty.
Problem - Now that I have the model selected NOW what do I do?
~ Answer~ Ok now you need to place your newly selected model in her own work space. All you have to do is this ~> Press CTRL C ~> CTRL N ~> CTRL V
WHAT THE HECK DOES THAT MEAN?? - Please see my shortcuts below.
After this is done you will see your model copy in the your picture in on the side. Toss out the white background so that you only have the model in the checkered background so that the model can be placed without a background into your work.
On a parting note, the real thing to do here is jus play around. It will click once you get it and then it will be easy.
Good luck!
~~~ ~~~ ~~~ ~~~ ~~~ ~~~ ~~~ ~~~ ~~~ ~~~ ~~~
~ PS shortcuts~
CTRL C - Copy
CTRL V - Paste
CTRL N - New layer or document
CTRL Z - Undo
CTRL Y- Redo
CTRL W - Close document
CTRL X - Cut from document
CTRL D - Deselect
Still confused? Or you want to learn something else? Let me know and I will try my best to help.
Special thanks to the stock artist used in this tutorial
© Filmchild Creations
Image size
2024x1740px 460.95 KB
Comments9
Join the community to add your comment. Already a deviant? Log In
This tutorial will help me a lot!!! thanks!!! I am new in Photomanipulations and having great difficulties in cutting out a model!!!